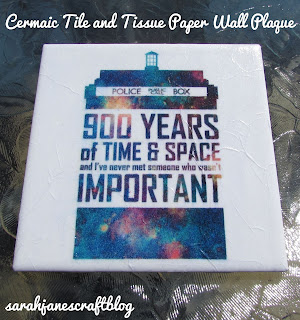
Ceramic Tile and Tissue Paper Wall Plaque
I picked up some tiles at the hardware store to make coasters, but I also grabbed some 6x6 ceramic coasters to make some other projects with. This white tile turned into a decorative wall plaque with one of my favorite Dr. Who quotes.
The first step is to find a design that you want to use. I found this one online. It had been posted to Pinterest and Tumblr. I think it was originally on a t-shirt, but after a little searching, I couldn't track down it's original source. If you know who designed this, let me know in the comments so that I can give them credit.
After I found the design I wanted to use, I pasted it into word and made sure the design was just under 6 inches so that it would fit neatly on my tile. Then I used the technique from my first Tissue Paper Photo Transfer project to print the design onto tissue paper that had been taped onto a piece of card stock. After the print came out clean (I replaced the 10 year old printer from the other project), I used my paper cutter to cut it down to a 6 inch square (I left it attached to the card stock so it would cut through the tissue paper neatly). If you don't have a paper cutter, I'd recommend a rotary cutter to get a straight line with tissue paper.
Next I put a very thin coat of mod podge down on the ceramic tile with a foam brush. Less glue means less wrinkles and less chance for warping or ripping of the paper. It also means that as soon as you set the paper down, it won't move, so keep that it mind.
I carefully lined up my paper and tapped it onto the glue. Then I smoothed it out. I was pretty pleased with how the initial gluing turned out. There were minimal wrinkles and the design stayed crisp and clean.
However, when I started painting my sealing coat of mod podge onto the top of the paper, the ink started to smear just a bit. I stopped spreading glue and tried to clean up some of the edges where it smeared by running some fresh glue over top. I left it to dry overnight and then came back and painted another thin coat over the top. It smoothed out a bit as it dried, but the design wasn't as crisp as when I first glued it down. Oh well, now I know to let the design dry all the way after it's initially glued down, and be really careful with the first thin coat of mod podge you glue over the top of the ink jet design.
It still turned out pretty well, so I grabbed a sawtooth picture hanger and some super glue to attach it.
I lined it up at the top of the tile with the ridges so it would be easy to get a nail underneath and put two generous dollops of glue on the tile to attach it. I let it dry over night, and it was ready to hang.
It was a pretty quick and easy project for some small wall art, and I can't wait to try it again.


Thanks so much for reading!
ReplyDelete